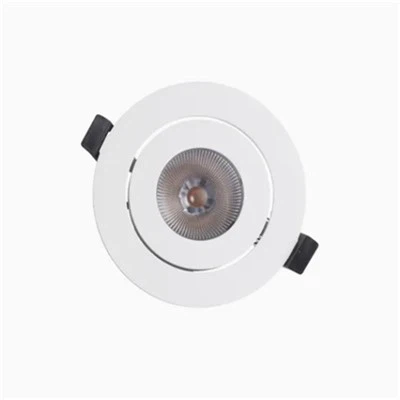
product Specification
| Input Voltage(V) | AC85-265V | Light Source | LED |
| Lamp Luminous Efficiency(lm/w) | 90 | Lifespan (Hours) | 50000 |
| Color Temperature(CCT) | 4100K (Neutral White) | Color Rendering Index(Ra) | 80 |
| Lighting solutions service | Lighting And Circuitry Design | Lamp Luminous Flux(lm) | 450 |
| Warranty(Year) | 3-Year | Lamp Body Material | PC |
| Beam Angle(°) | 120 degrees | Support Dimmer | No |

Core Product Features
1. Superior Brightness & Precision Lighting
Designed with high-performance DOB (Driver-On-Board) LED chips, this downlight delivers consistent, glare-free brightness with exceptional light transmission. The precision-engineered lens focuses light exactly where you need it, eliminating hotspots and ensuring even illumination across the room. Whether you're highlighting a cozy living room corner, a retail display, or a hotel hallway, its adjustable angle feature lets you tailor the beam to suit your needs, creating the perfect ambiance for every occasion.
2. Energy Efficiency & Long-Lasting Performance
Say goodbye to frequent bulb replacements and high electricity bills. This LED downlight consumes significantly less power than traditional incandescent or fluorescent lights, cutting energy costs by up to 80% without compromising brightness. Built to last an impressive 50,000+ hours, it delivers reliable performance for years-no flickering, no dimming, no maintenance headaches. The DOB design further enhances durability, reducing the risk of driver failure and ensuring stable, flicker-free light even with prolonged use.
Core Product Features
3. Durable, Heat-Resistant Build
Crafted from high-quality polypropylene plastic, the downlight's housing offers excellent heat dissipation, preventing overheating and extending the lifespan of the LED components. The robust, impact-resistant material is built to withstand daily wear and tear, making it ideal for high-traffic areas like offices, restaurants, and shopping malls. Its sleek, matte white finish resists discoloration and scratches, maintaining a clean, modern look for years to come.
4. Sleek, Integrated Design for Any Decor
With its low-profile, integrated form factor, this downlight blends seamlessly into ceilings, walls, and architectural features. The minimalist white trim complements any interior style-from contemporary and Scandinavian to classic and industrial-without drawing attention away from your decor. Unlike bulky lighting fixtures, its compact design creates a clean, uncluttered look, making it perfect for both small and large spaces alike.
5. Versatile for Every Setting
This downlight isn't limited to one use case:
Residential Spaces: Perfect for living rooms, bedrooms, kitchens, and bathrooms, providing soft, even light for daily activities and cozy evenings.
Commercial Venues: Ideal for offices, retail stores, restaurants, and hotels, offering professional-grade illumination that enhances productivity and customer experience.
Accent Lighting: Use it to highlight artwork, architectural details, or display shelves, adding depth and visual interest to any space.


🛠️ Effortless Installation & Usage: Light Up Your Space in Minutes
Step 1: Pre-Installation Preparation
First, ensure the power to the installation area is turned off at the circuit breaker to avoid electrical hazards. Measure the ceiling cutout size (compatible with standard cutout diameters for most models) to confirm a snug fit, and gather any basic tools you may need (typically no complex tools are required).
Step 2: Mounting the Downlight
The downlight's spring-loaded mounting clips make installation quick and secure:
Gently compress the orange plastic clips on either side of the fixture.
Insert the downlight into the pre-cut ceiling hole, ensuring the housing sits flush against the ceiling surface.
Release the clips-they will automatically expand to grip the ceiling from behind, holding the fixture firmly in place without the need for screws or additional hardware.
Step 3: Electrical Connection
Connect the downlight's wires to your home's electrical system, following standard wiring protocols:
Match the live, neutral, and ground wires (if applicable) to the corresponding terminals on the fixture.
Secure the connections with wire nuts, then tuck the wires back into the ceiling cavity to keep the area neat and safe.
Step 4: Final Setup & Adjustment
Once installed, restore power to the circuit and test the downlight. If needed, gently adjust the angle of the light head to direct the beam exactly where you want it. The fixture's flexible design allows for easy repositioning even after installation, making it simple to update your lighting layout as your needs change.
Pro Tips for Optimal Use
For larger spaces, install multiple downlights in a grid pattern to ensure even illumination across the room.
Pair with dimmable switches (compatible with most standard dimmers) to adjust brightness for different moods and activities.
Keep the fixture's lens clean with a soft, dry cloth to maintain maximum light output over time.
Our firm prides itself on owning its own factory, guaranteeing complete control over the production process and the quality of our goods. We are not only agents; we are manufacturers committed to offering our clients the most competitive rates available. We invite consumers to evaluate our samples first, as we are assured that the quality and pricing of our items are self-evident. Our dedication to excellence and client satisfaction compels us to consistently perform at our best and provide superior quality products.
Our address
3rd Floor, 5th Building, Hebei Industrial Park, Hualian Community, Longhua District, Shenzhen, China