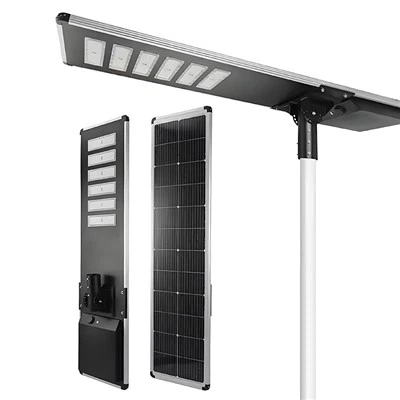
Are you wondering how to install an integrated motion sensor solar LED street light? Look no further, as we have put together a simple guide to help you install your LED street light in no time.Integrated motion sensor solar LED street lights have become one of the most popular outdoor lighting solutions for residential neighborhoods, private driveways, rural roads, garden pathways, parking lots, and commercial perimeter lighting. Unlike traditional split solar street lights with separate solar panels, batteries, and lamp bodies, the all-in-one integrated design combines solar panels, LED light sources, motion sensors, built-in batteries, and intelligent control systems into a single compact fixture. This streamlined structure greatly simplifies installation procedures, reduces wiring complexity, and enhances overall durability and weather resistance. Equipped with high-sensitivity motion sensors, these lights can intelligently identify surrounding movement, automatically brightening when people or vehicles pass and dimming or turning off when the area is idle. This intelligent working mode not only maximizes solar energy utilization and saves electricity costs but also improves outdoor safety by deterring trespassers and illuminating dark areas at night. While these fixtures are designed for user-friendly DIY installation, improper operation or overlooked details can lead to poor charging efficiency, sensor failure, unstable lighting, or shortened service life. This step-by-step guide elaborates on every installation procedure with practical tips to help you complete a standard, safe, and long-lasting installation effortlessly.
Firstly, ensure that the solar panel is exposed to sunlight so that it can efficiently charge during the day.As the core energy harvesting component of the entire solar street light system, the solar panel's sunlight exposure condition directly determines the battery charging efficiency and the nighttime lighting duration of the fixture. Any obstruction blocking sunlight will result in insufficient power storage, causing the light to fail to turn on or run out of power quickly at night. Before installation, switch your light on and test it to ensure that it operates correctly. This pre-installation test is a crucial preparatory step that many users overlook. Turning on the switch in advance allows you to verify the basic functionality of the LED light source, motion sensor induction, and internal battery power. It helps you rule out product quality issues such as faulty circuits, dead batteries, or unresponsive sensors before formal installation, avoiding unnecessary rework and disassembly after installation.Also, ensure that all the necessary mounting hardware is available.Standard mounting accessories usually include fixed poles, mounting brackets, locking screws, waterproof connecting cables, and fixing bolts. Before starting construction, check all accessories against the product manual to confirm no missing or damaged parts, ensuring the installation process can be completed smoothly without interruptions.
Step 1: Choose the mounting location
The first step in installing the solar LED street light is to choose the most appropriate location. Site selection is the foundational step that determines the long-term working performance of your integrated solar street light, and it cannot be replaced by later debugging and adjustment. A reasonable installation position can ensure stable solar energy collection, sensitive sensor response, and uniform lighting coverage, while an inappropriate location will lead to persistent use problems.Make sure that the location receives enough sunlight throughout the day to ensure that the light can charge adequately.It is recommended to select open, unobstructed positions that can receive at least 6 to 8 hours of direct sunlight daily. Avoid shaded areas blocked by tall trees, building eaves, walls, billboards, or other shelters, as persistent shading will severely reduce solar charging efficiency. In addition, you need to avoid locations with long-term building reflections, strong light interference, or easy water accumulation, which may cause sensor misjudgment and equipment damp damage. Meanwhile, combine the actual lighting demand of the site: select positions that can cover key lighting areas such as driveways, walkways, and yard perimeters, ensuring that the light's irradiation range can fully meet daily night lighting and safety monitoring needs.
Step 2: Install the pole
Once you have chosen the mounting location, install the pole.The lamp pole acts as the fixed support and height carrier of the integrated solar street light, and its installation stability and height standard directly affect the lighting range, sensor detection effect, and wind resistance safety of the fixture. Ensure that the pole is firmly secured to the ground and is at a height that will provide sufficient lighting.For conventional courtyard and driveway lighting, a pole height of 3 to 5 meters is the most suitable, which can balance wide lighting coverage and accurate motion sensor detection. Too low a pole will result in limited lighting range and easy false induction of pedestrians and vehicles; too high a pole will cause scattered light, reduced ground brightness, and weakened sensor induction sensitivity. During installation, the pole must be vertically fixed with a level tool to avoid tilting. For outdoor open-air environments with strong wind, it is best to bury the pole base deeply or fix it with cement pouring to improve overall stability and prevent inclination or collapse caused by strong wind and external impact. Use the mounting hardware included with the light to attach it to the pole.Align the lamp body bracket with the pole's reserved fixing position, tighten the special fixing screws one by one, and ensure the lamp body is closely attached to the pole without shaking or displacement, laying a stable foundation for subsequent component connection and long-term operation.

Step 3: Connect the solar panel
The solar panel should be mounted on top of the light or installed separately in a location that receives enough sunlight. Most integrated motion sensor solar street lights adopt an integrated upper solar panel design, which is compact and beautiful without occupying extra space. If the local installation position has partial shading, you can also choose a separate installation method to adjust the solar panel to a fully sunlit position flexibly. When installing the solar panel, adjust the angle appropriately according to the local solar irradiation direction, so that the panel faces the sun directly to maximize light absorption and photoelectric conversion efficiency, effectively improving daily power storage capacity.Use the included connecting cable to connect the solar panel to the light.The matching special waterproof connecting cable has positive and negative pole identification marks, which can effectively avoid wrong wiring. During connection, insert the cable plug in place and lock the waterproof interface tightly to prevent rainwater, dust, and humid air from penetrating into the circuit, causing short circuits, electric leakage, or component aging. After connection, sort out the cable neatly, fix it along the pole with cable ties to avoid sagging and swinging, and prevent the cable from being worn and damaged by long-term wind blowing and friction.
Step 4: Test the light
You should test the light to ensure that it is working correctly. After completing all installation and connection work, the overall functional test is an indispensable key step to verify the installation quality and equipment performance, which can timely discover and solve hidden installation problems.Turn the switch on and wait for the light to come on.Since solar street lights adopt intelligent light control induction design, you can cover the solar panel to simulate a dark night environment after turning on the switch, so as to trigger the light to turn on normally and check whether the LED light source emits light evenly and stably without flicker, dimness, or local failure. Make sure that the motion sensor is functioning correctly by moving around within the range of the light's sensors.Walk back and forth, stay and move quickly in the preset lighting and induction area to test the sensor's induction sensitivity and response speed. Observe whether the light can automatically brighten when detecting moving objects and automatically dim or turn off after the objects leave. Meanwhile, check the sensor induction range to ensure no induction blind spots or false induction failures, confirming that the intelligent sensing function operates normally and stably.
Step 5: Adjust the settings
The solar LED street light usually comes with settings that allow you to adjust the light's brightness levels, motion sensor sensitivity, and duration.Different outdoor scenarios have different lighting and induction requirements, and the factory default settings cannot fully adapt to all site environments. Therefore, targeted parameter adjustment according to actual use needs can maximize the equipment's use effect and energy-saving performance. For example, high-traffic roads and activity areas can set higher brightness and longer lighting duration, while quiet garden paths can appropriately reduce brightness and shorten delay time to save solar power consumption. The motion sensor sensitivity can be adjusted according to the surrounding environment: higher sensitivity for remote and open areas to capture subtle movement, and lower sensitivity for complex environments with frequent stray animal activities to avoid frequent false triggering. Follow the manufacturer's instructions to configure the settings.Carefully read the official setting tutorial, operate through the supporting remote control or built-in control buttons, confirm each parameter setting is accurate, and test repeatedly after adjustment to ensure the customized settings match your daily lighting and safety needs perfectly.
In conclusion, installing an integrated motion sensor solar LED street light is a straightforward process that can be accomplished in a short time. Compared with complex traditional street light installation that requires wiring, trenching, and circuit debugging, the integrated all-in-one design greatly lowers the installation threshold, enabling ordinary users to complete DIY installation independently. All you need to do is choose the right location, install the pole, connect the solar panel, test the light, and adjust the settings. Compared with complex traditional street light installation that requires wiring, trenching, and circuit debugging, the integrated all-in-one design greatly lowers the installation threshold, enabling ordinary users to complete DIY installation independently.With your new LED street light, you will enjoy bright and energy-efficient lighting for years to come.This type of solar street light relies on clean solar energy for power supply, with zero daily electricity consumption, intelligent induction energy saving, and excellent outdoor weather resistance. Standard installation and reasonable setting matching can effectively extend the service life of the fixture, provide stable, safe, and environmentally friendly night lighting for your courtyard, road, and outdoor space, and bring long-term convenient and economical use value.

How To Cooperate With Us?
Because of our own facilities, we have complete control over the production process and the quality of our goods, which makes us very pleased. We are committed to giving our clients the greatest price since we are manufacturers rather than just brokers. We encourage clients to evaluate our samples first since we are certain that the cost and quality of our items are transparent. Our dedication to excellence and client happiness motivates us to consistently provide superior products.
Our address
3rd Floor, 5th Building, Hebei Industrial Park, Hualian Community, Longhua District, Shenzhen, China