Preface to T8 Tube Light Application and Installation Standard
Definition and Market Application of Modern T8 LED Tube Lights
T8 linear tube lights are standardized 26mm diameter cylindrical linear lighting fixtures compliant with IEC 60081 fluorescent lamp dimensional specification. Upgraded LED-type T8 tubes have gradually replaced conventional gas-filled fluorescent T8 tubes in residential indoor spaces, commercial office floors, retail supermarkets, warehouse storage areas and institutional public corridors. Compared with traditional mercury-containing fluorescent tubes, premium T8 LED tube lights feature 70% lower power consumption, 50000-hour rated service lifespan, zero mercury hazardous substance composition, lower lumen depreciation and stronger anti-interference luminous stability. However, non-standard manual installation will lead to tube burnout, circuit short circuit, luminous flickering and electric leakage risks, so standardized step-by-step installation is essential for long-term operational safety and optimal luminous performance.
Core Installation Pre-Standards and Industry Compliance Rules
All T8 tube replacement and installation operations shall comply with NEC National Electrical Code, IEC 60598 luminaire safety standard and local low-voltage indoor electrical operation guidelines. The whole renovation project belongs to low-voltage lighting circuit modification, requiring power cutoff operation, classified wire docking, ballast bypass processing and closed grounding protection. Two mainstream retrofitting modes are included: full ballast removal hardwired mode and reserved electronic ballast compatible mode, which require differentiated wiring operation procedures to match different old lamp bracket structures.
Pre-Installation Tool Preparation and Hazard Assessment
Before formal construction, operators shall prepare insulated screwdrivers, electrical insulating gloves, wire strippers, electrical tape and multimeter for circuit testing. Meanwhile, complete on-site hazard assessment: confirm aging degree of original lamp bracket, check wall circuit aging condition, confirm residual voltage inside the lighting loop, and mark live wire, neutral wire and grounding wire identification. Operators without low-voltage electrical operation qualification are prohibited from disassembling internal wiring components independently to avoid personal electric shock and facility damage accidents.

Standard Step-by-Step Compliant Installation Procedure for T8 Tube Lights
Step 1: Complete Dual Power Cutoff and Residual Voltage Release
Single switch power cutoff cannot eliminate residual circuit voltage inside lamp fixtures, which is the main hidden cause of accidental electrocution. The standardized power-off operation follows dual interlocking steps. Firstly, toggle the wall-mounted light control switch to the permanent OFF state to cut off control loop power. Secondly, locate the corresponding branch circuit breaker inside the household or distribution electric box, switch off the dedicated lighting circuit breaker, and hang warning signs to prevent unauthorized power restoration by other personnel.
After power cutoff, wait 60 to 90 seconds to release residual capacitance voltage stored in the original ballast and circuit lines. For high-power multi-tube integrated lamp brackets, use a multimeter to verify zero loop voltage before touching any metal wiring components, fully eliminating electric shock risks during subsequent disassembly work.
Step 2: Demolish Original Mercury-Containing Fluorescent Tube Safely
After confirming zero circuit voltage, start disassembling the outdated conventional fluorescent tube from both-end pin lamp holders. Hold the middle glass tube position stably instead of grasping tube pins, rotate the fluorescent tube counterclockwise at 30 to 45 degrees to separate metal pins from socket clamping slots, then pull the tube outward horizontally to detach it completely. Do not apply violent twisting or bending force to the glass tube body.
Critical environmental safety notes: traditional fluorescent tubes are filled with trace liquid mercury and inert glow gas. Once cracked or broken, mercury vapor will diffuse into indoor air, causing respiratory damage to human bodies and permanent soil pollution after waste disposal. Damaged waste tubes must be packed into sealed hard plastic containers, classified as hazardous electronic waste, and delivered to professional recycling institutions instead of ordinary household garbage disposal.
Step 3: Disassemble Fixed Ballast Cover of Lamp Bracket
Every integrated fluorescent lamp bracket is equipped with a dedicated metal ballast protective cover, used to wrap internal magnetic ballast, electronic ballast, built-in wiring and starter components. The cover adopts two common fixing structures: cross-head screw fixed type and elastic buckle clamping type. For screw-fixed covers, remove all fixing screws with insulated screwdrivers and place screws in centralized storage to avoid loss. For buckle-type covers, press side elastic buckles inward gently to release clamping force, then pull down the cover vertically to expose the internal electrical cavity.
Check the inner cavity integrity after cover removal: clean accumulated dust, insect debris and damp stains inside the bracket, avoid conductive dust causing wire short circuit after new tube installation, and check whether the original wiring sheath has aging cracking for timely replacement.
Step 4: Classified Removal or Bypass Treatment of Ballast and Starter
Ballast and starter processing is the core technical step determining T8 LED tube operating efficiency. T8 LED tubes are self-driven luminous fixtures, which do not need auxiliary voltage boosting components including ballast and glow starter, requiring classified processing based on original ballast type.
For traditional magnetic copper-coil ballast: completely cut off connected input and output wiring, remove fixing bolts to dismantle the whole magnetic ballast from the lamp bracket base, as magnetic inductance will cause severe LED stroboscopic interference and extra power consumption. For upgraded electronic ballast: direct removal is optional, while professional bypass wiring is the recommended operation to isolate ballast circuit, avoiding signal interference affecting LED constant-current operation.
Remove the cylindrical glow starter installed on the lamp bracket side socket uniformly. All dual-pin T8 LED tubes cancel starter startup structure, reserved starter will form loop voltage conflict, leading to tube non-ignition and circuit heating failure after power-on.
Step 5: Align and Lock New T8 LED Tube into Standard Socket
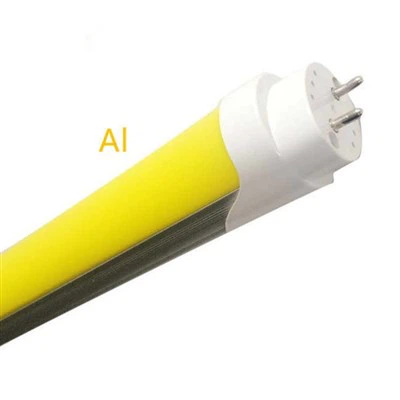
Match tube pin specification with lamp holder slot before installation: mainstream T8 tubes adopt double-end 2-pin conductive structure. Align two metal end pins of the T8 LED tube with reserved grooved positions on both-end lamp sockets horizontally, push the tube inward slightly into the clamping base, then rotate the tube clockwise 30 degrees until obvious locking click sound is heard.
Post-installation inspection standards: the tube body fits parallel to the lamp bracket without tilting; metal pins are fully embedded in sockets without exposed gap; the tube cannot fall off under slight external pulling force. Avoid one-sided forced installation, which will bend internal pin terminals and cause poor conductive contact.
Step 6: Standard Mains Wiring and Isolated Circuit Docking
After ballast bypass or removal, implement direct mains hardwiring per official product wiring schematic. Distinguish standard color-coded circuit lines: brown live wire (L), blue neutral wire (N), yellow-green grounding wire (PE). Connect two-end lamp holder conductive wires directly to building mains live wire and neutral wire separately, reserve grounding wire to connect lamp bracket metal shell for anti-leakage protection.
Wrap all stripped wire joints with high-voltage resistant electrical insulation tape, ensure no bare copper wire exposed inside the lamp cavity. It is forbidden to mix live wire and neutral wire for random docking. Users without professional wiring identification capability shall entrust licensed electricians to complete circuit docking, preventing reverse wiring leading to irreversible LED drive damage.
Step 7: Reset Protective Cover and Complete Power-On Commissioning
Finish wiring inspection firstly: confirm all wire joints are firm, no wire extrusion between cover and bracket base, no loose internal components. Restore the ballast protective cover to the original position, fasten fixing screws or snap elastic buckles tightly to restore the integrated closed structure of the lamp fixture. The closed cover can block external dust, moisture and accidental touch, improving long-term circuit safety.
Cancel on-site power-off warning signs, close the branch circuit breaker and toggle the wall light switch to restore power supply. Observe tube luminous state: qualified installation presents uniform flicker-free stable light output. If phenomena including no lighting, partial brightness, buzzing sound appear, cut off power immediately to recheck wiring and pin connection status for troubleshooting.
Critical Installation Safety Specifications and Common Fault Prevention
Mandatory Personal Safety Operation Norms
Operators must wear insulated protective gloves during the whole disassembly and wiring process; it is prohibited to conduct installation operation with wet hands or in humid ceiling environments. Do not modify tube pin structure or extend original circuit wires privately, any non-standard modification will void product after-sales warranty and trigger electrical safety hazards.
Common Installation Faults and Root Causes
Flickering light after power-on mostly results from un-bypassed residual electronic ballast; tube failure to light up is caused by reverse live-neutral wiring or pin misalignment; local heating of lamp holder comes from loose wire joints. All faults can be avoided by following standardized ballast bypass and color-based wiring procedures.
Post-Installation Daily Maintenance Suggestions
Check lamp cover fastening condition quarterly, clean surface dust regularly to guarantee light transmittance; inspect circuit joint aging condition half-yearly for long-term used fixtures. Keep indoor installation environment dry, avoid installing T8 tubes in high-humidity unventilated areas without waterproof treatment.
Conclusion
Professional proper installation of T8 LED tube lights is a standardized low-voltage electrical renovation project integrating power safety operation, component classification processing and standardized wiring construction. The complete procedure covers dual power cutoff, hazardous waste fluorescent tube disposal, ballast classified removal or bypass, accurate tube locking, code-compliant mains docking and final power-on testing. Different from casual simple replacement, standardized installation complies with global indoor electrical safety codes, eliminates electric shock, short circuit and mercury pollution risks, maximizes LED luminous efficiency, stabilizes long-term service lifespan of T8 tubes, and reduces later circuit failure and maintenance cost. Untrained personnel shall hire certified electricians for construction to guarantee personal safety, fixture stability and compliant indoor lighting operation.

How To Cooperate With Us?
Having its own factory gives our firm complete control over the production process and the quality of our goods, which we take great pride in. We are manufacturers, not only brokers, committed to offering our clients the lowest costs. We invite consumers to evaluate our samples first since we are certain that the cost and quality of our items are evident. Our dedication to excellence and client happiness motivates us to consistently provide superior products.
Our address3rd Floor, 5th Building, Hebei Industrial Park, Hualian Community, Longhua District, Shenzhen, China